Jan 26, 2012

K andrew Stamped Card

Wow! Can I just tell you how excited I am today!  I'm so honored to be given the privilege of being a featured blogger over at Getting Cricky with K Andrew.  This was my first time ever using the K Andrew stamps. I had been introduced to the stamps by my fellow blogger friend Cheri over at DJ Sundries.  I have to tell you that once I tried the stamps, I was hooked. The stamps themselves are great, very high quality, and versatile as well. All of the sets are interchangeable, and I really want to get them all. For my card design, I used the Winter Wishes set, and the Crafty Friends set. 


The "Best Wishes" sentiment is from the "Winter Wishes" stamp set. I stamped this sentiment onto Coordinations card stock paper. It is usually difficult to achieve a nice look using stamps on textured paper, but not with the K Andrew stamps! 


For the inside of the card, I stamped the "from the heart" sentiment onto a small tag. This sentiment came from the Crafty Friends stamp set.  

With Each stamp set purchase at least $1 per stamp set goes to benefit the charity noted on the stamp set package. K Andrew donates to the following charities: Cancer Angels, Storefront Shelter for Homeless Children, Intrepid & Fallen Heroes, E. Glaser Pediatric AIDS Foundation, Doorways Shelter for Women & Children (Domestic Violence), Wayside House for Women, Camp Good Days & Special Times, Adopt a Classroom, and Autism Research Institute. So you can feel good that each time you purchase a K Andrew Designs art stamp set, someone around the country is receiving some good help!

K Andrew stamps are all made and assembled here in the USA,  This ensures all product materials are safe and jobs are being provided and maintained here in America. You can learn even more about K Andrew stamps (and pick some up for yourself) by visiting K Andrew designs. 


I know that I'll be stopping by to purchase more sets. I really enjoy the stamps. I hope that once you get a chance to try them, that you'll enjoy them as much as I do,
P.S. There will be no Freebie Friday post this week, I'll be back to blog to you all next week. So, until then, have a wonderful weekend. 

Blessings,
 photo my custom signature_zpseg74gyud.png

Jan 24, 2012

Valentine Cherry Pie Pops


Once upon a time, there was a bored stay at home mom. She was just browsing Etsy when suddenly inspiration struck. She saw these adorable Valentine Cherry Pie Pops. The cost: $12.00 a dozen + shipping. Whew. 

(O.K. that's enough of the third person narrative.)   
So, I decide that I'm going to make these myself. Why might you ask?
1. Because I'm el cheapo and refuse to pay that much for "treats"
2. Because I'm a DIYer 
3. Because I needed something to put on this blog for Valentines Day.
4. Because my daughter wanted me to.
Now, the last reason is absolutely the best reason, and we had a lot of fun making these. She could hardly wait to eat one. Yes, that's her holding one. 
Let me now share with you how I made them. 
You will need:
-Pillsbury rolled pie crust
- can of cherry pie filling
-Wilton Lollipop Sticks, 8", 25 count
First, carefully unroll the pie crust, then you'll need to cut 2-inch diameter circles. I used a measuring cup to cut out my circles. 
next, cut out a heart shape from the circle that will be your top. ( be careful not to cut the heart out to large, or the filling will leak out. ) I just free handed it, using a knife.
Place 2 halved cherries from the pie filling onto the bottom circle. 
now, carefully place the top circle over the cherry filled circle. Now add the lollipop stick, make certain the stick is from the bottom almost to the top. ( if the stick isn't all the way to the top, then your pie pop will fall off when you try to pick it up by the stick.)
Once you've placed the stick, pinch down the edges using a fork. 
Lay pops onto a baking sheet, bake at 350 degrees for about 15 minutes, or until golden brown. It may even be fun to use the extra heart cutouts for added embellishment. 
All finished, now time to wrap them up cute to share with loved ones. 

Just wrap with plastic, tie on a little pink raffia, and attach a free printable gift tag. The gift tags were generously provided by
 Art by Julie H. (sorry, these tags are no longer available)
I hope that you enjoy the fun idea, and make the most of it. 
Thank you for stopping by,

 photo my custom signature_zpseg74gyud.png

Jan 16, 2012

All Boy Scrapbook layout

Have you ever looked at someone's scrapbook, and thought to yourself  " wow, I wish that I could do that." Or thought, " I'd never have the time, where would I even begin? " 
That is what I used to think until I finally decided that I was just going to do it. I'm still a newbie to scrapbooking, but I can attest to the value of this popular "hobby". ( I use the term "hobby" loosely.)
Scrapbooking is something that can be done with others. Family and friends who get together to scrapbook are creating lasting memories. My 10-year-old daughter loves to scrapbook with me, and I really enjoy showing her all of the new techniques that I've learned. ( Techniques that my friends have shown me. )
Scrapbooking is also a very personal way to preserve your cherished moments. Everyone begins to find their own sense of style and design. This is something valuable to the future generations who will look at your pages. They will be seeing a small piece of who you are on every page. Making scrapbook pages also gives you more space to journal about your memories. Future generations would be blessed to read what grandma wrote about mom. When I was a girl I loved to look through the family photo albums, but sometimes my grandparents could not remember what a photo was, or why it was kept. Scrapbooking your pictures keeps you from forgetting.

This is my latest page, using My Minds Eye papers and embellishments. I also used some coordinations cardstock paper from my stash.
The little wood heart was from my stash, I inked it using Tim Holtz distress ink. The gift tag is a free printable as seen in my last Freebie Friday post. 

But what if your just not a paper cutting kind of person? Well, with all of the digital scrapbooking options out there, you don't have to be. You could do all of it on your computer. No mess, No glue, No printing pictures to begin. Just place your pictures, journal, and print or write onto a disc. I personally recommend the My Memories Suite v.3 software. It allows you to be simple and just drag pictures to the page, or get as creative as you would like, and customize your own page. It's easy to install and easy to use. To see some pages that I've created in the past using this program click here. 

So what are you waiting for... go on and preserve your memories for others to enjoy. 

Blessings,
 photo my custom signature_zpseg74gyud.png

Jan 4, 2012

DIY Personalized wood boxes


I really wanted to do something special for my nieces this year for Christmas. They're growing up, and toys just aren't their thing anymore. I thought what girl doesn't want her own private place to keep her special items in...  So I made my nieces these personalized boxes, they really are simple to make, yet look like you paid alot for them in some fancy boutique. I would have loved something like this as a girl! Let me show you how I did it. 
First I started with a plain wood box that had black metal accents. I forgot to take a before picture, but I bought this exact same box from my local Hobby Lobby. Using a 40% of coupon made the cost of the box around $4. 

Next, I painted the entire box using bright white base by Kilz. I even painted completely over the black metal accents. 
Then I sanded the entire box in order to smooth it, and distress it. I really wanted to sand over the metal accents to add that distressed look. 
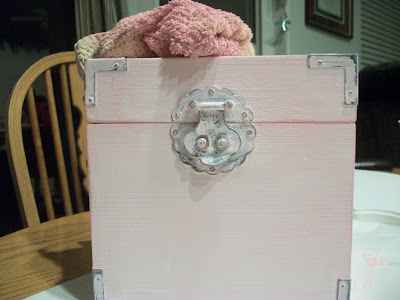
Now to add some color. To do this I used ordinary acrylic craft paint. I added water to the paint until it was the consistency of colored water. Then I quickly painted the water mixture onto the box, and quickly wiped it off (using an old, dry wash cloth) before it dried. The color stays in the wood grain giving the box a sort of cool, but antique look. The more that you repeat this process the darker that the color becomes, so you control the look of the box.
After the paint dries, I adhered coordinating scrapbook paper to the inside of the box using good ole Mod Podge.
here's another look at the inside of the boxes when finished. 
( tip- if paper wrinkles don't worry, the wrinkles go away once the Mod Podge has completely cured. This should take about 24hrs. Also you can sand off any excess paper that comes out over the top of the box)
For the top of the box, I cut out a bird image from coordinating scrapbook paper. I used Mod Podge to adhere the bird, then I free hand painted the tree limbs. Lastly, I sanded over it all to add that distressed look. 
Now for the best part, The personalizing! I used the pencil transfer technique that I shared in my necklace hanger tutorial. The only difference is that instead of a scroll design, I'm using letters. I found both fonts at dafont.com. You can download any font from their site for FREE! 
This box I made for my son over the summer using an old bread box that I found at my local thrift store. I did have to power sand it first, but it was so worth it! I have many more ideas for boxes using the same techniques. I'll be back to share more with you later... until then, happy crafting!
 photo my custom signature_zpseg74gyud.png


Enhanced by Zemanta